
Titan Fine-Finish Sprayer Parts · AirCoat
Find the Correct AirCoat Assembly Before Ordering Replacement Parts
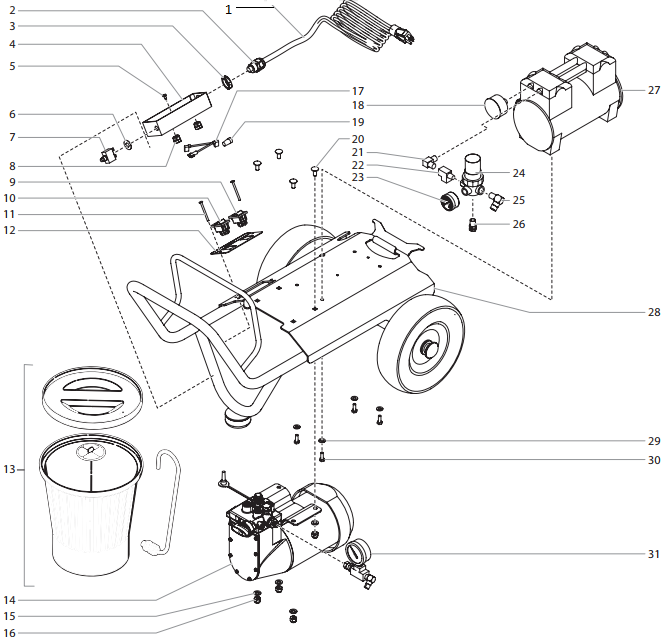
Use the Titan AirCoat Air-Assisted Airless Spray System hub to reach the correct Main Assembly, Diaphragm Pump, Cart Assembly, Hopper Assembly, optional Suction Set, or Pump Head Assembly. Each linked page organizes diagram-matched replacement parts for a specific system area, helping contractors and repair shops identify components accurately.
How the AirCoat Spray System Is Organized
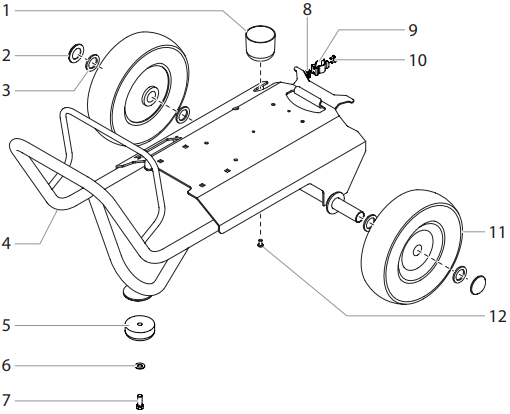
The Titan AirCoat Air-Assisted Airless Spray System combines the high transfer efficiency of air-assisted spraying with the productivity of airless fluid delivery. The system uses a pneumatic drive to generate coating pressure while compressed assist air improves atomization, producing a controlled spray pattern with reduced overspray and a high-quality finish for industrial wood finishing, metal fabrication, cabinetry, furniture manufacturing, and other precision coating applications. The AirCoat 620 Cart Assembly forms the structural foundation of the spray system by supporting the complete machine during transportation, operation, maintenance, and storage. The cart frame carries the fluid pump, air motor, filter assemblies, regulator assemblies, and associated pneumatic and fluid components while providing the mobility required to move the sprayer safely throughout workshops and production facilities. A properly aligned cart also helps maintain equipment stability, protects mounted assemblies from unnecessary vibration, and provides secure support when servicing the machine.
The assembly consists of the handle assembly, handle sleeves, mounting screws, adjustment knobs, cart frame, wheel pins, wheels, wheel spacers, frame plugs, and protective sleeves. These components work together to provide ergonomic handling, smooth rolling movement, proper wheel alignment, and long-term structural durability while protecting exposed frame tubing from wear and accidental damage.
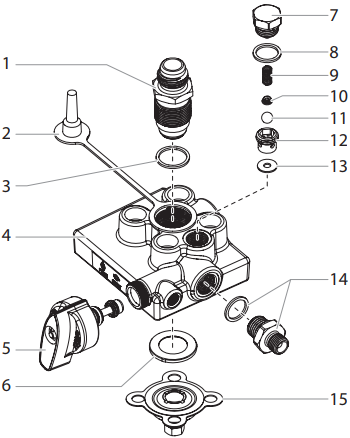
The exploded parts diagram enables technicians and maintenance personnel to identify every structural, mobility, retaining, and protective component individually before repair. Matching the diagram reference number with the correct Titan part number helps ensure accurate replacement of worn or damaged cart components while maintaining the original handling characteristics, stability, and serviceability of the AirCoat 620 Air-Assisted Airless Spray System.
Systems Covered by the AirCoat Hub
- Electrical power, compressor, air regulator, gauges, relief valve, hoses, couplers, and principal controls.
- Diaphragm-pump components that create smooth coating-material movement.
- Pump-head inlet, prime/spray, diaphragm, outlet-check, sealing, and fitting components.
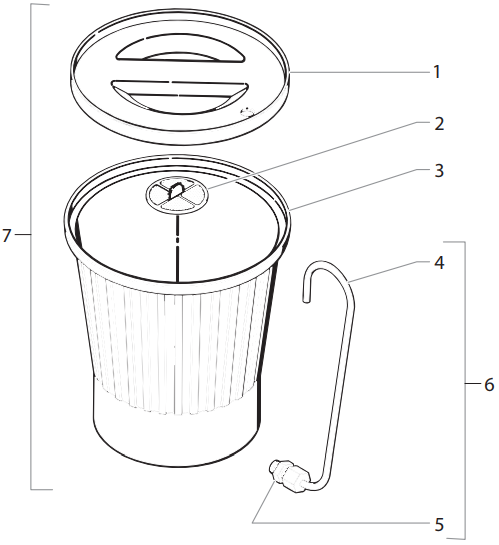
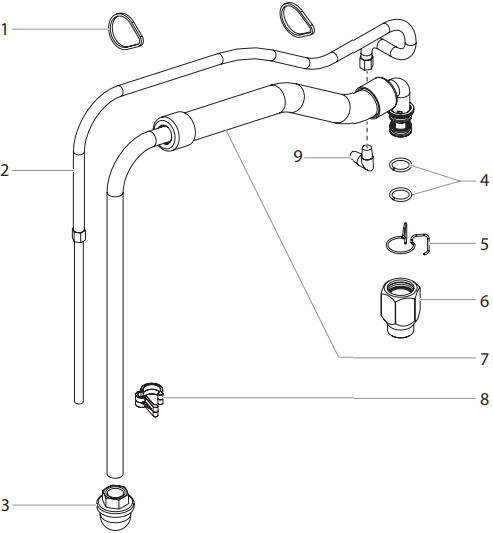
- Hopper and optional suction-set components used for material supply and recirculation.
- Cart frame, wheels, brackets, handles, fasteners, and assembly-mounting hardware.
When Contractors Use This Machine Page
- Locating the correct AirCoat assembly before purchasing a replacement component.
- Diagnosing weak atomizing air, unstable material flow, pressure loss, or failure to prime.
- Choosing between hopper-fed and optional suction-set service paths.
- Planning repairs that involve more than one connected assembly.
- Finding verified internal links for AirCoat service and wear parts.
Choose the Correct AirCoat Assembly by Symptom
Use the operating symptom to select the most relevant assembly page, then inspect connected systems before purchasing parts.
Major AirCoat Assembly Pages
Use these verified subcategory pages to narrow the system to the correct repair area before selecting individual replacement parts.
AirCoat Air-Assisted Main Assembly
Covers electrical power, compressor, regulator, gauges, hoses, couplers, hopper mounting, and principal machine controls.
AirCoat Air-Assisted Diaphragm Pump
Covers the diaphragm-pump components responsible for producing controlled material movement and pressure.
AirCoat Air-Assisted Cart Assembly
Covers the cart weldment, wheels, spacers, hub caps, washers, clips, and mounting hardware.
AirCoat Air-Assisted Hopper Assembly
Covers the five-liter hopper, cover, fine and coarse screens, return tubes, fittings, and related supply parts.
AirCoat Air-Assisted Suction Set
Covers the suction hose, return hose, 16-mesh inlet filter, O-ring, clips, elbow fitting, and routing hardware.
AirCoat Air-Assisted Pump Head Assembly
Covers the inlet valve, prime/spray valve, diaphragm, outlet ball, spring, seat, seals, connectors, and outlet fitting.
How to Find the Correct AirCoat Replacement Part
Follow this sequence to reduce fitment mistakes and avoid replacing parts that are not responsible for the operating problem.
Identify the failed function
Determine whether the issue involves electrical power, atomizing air, material supply, pump movement, fluid control, or cart hardware.
Open the assembly page
Select the Main, Diaphragm Pump, Cart, Hopper, optional Suction Set, or Pump Head page that matches the system area.
Match the exploded view
Locate the numbered diagram callout and record the exact Titan part number.
Inspect connected components
Check adjoining hoses, seals, filters, fittings, fasteners, controls, wiring, and mounting points before ordering.
Maintenance Practices That Protect the AirCoat System
- Relieve fluid and air pressure and disconnect electrical power before inspection or service.
- Flush the coating path thoroughly after use with a cleaning material compatible with the sprayed coating.
- Clean hopper screens or the optional suction-set inlet filter before material buildup restricts flow.
- Inspect suction and return hoses for cracking, blockage, collapse, abrasion, or loose connections.
- Check compressor filtration, air tubing, regulator, gauges, relief valve, couplers, and fittings for leakage or restriction.
- Inspect the cart, wheels, brackets, handles, fasteners, and mounted assemblies before transport.
- Investigate changes in pressure, priming, atomizing air, or material flow before secondary damage occurs.
Build a Complete AirCoat Repair Plan
Begin with the assembly that matches the failed function, then inspect every connected system. Pump-head repairs should include the diaphragm pump, material supply, prime/spray valve, inlet and outlet checks, seals, and fittings. Main-assembly repairs should include electrical power, compressor output, regulation, gauges, hoses, and couplers.
Hopper or suction-set repairs should include screens or filters, hoses, O-rings, return paths, fittings, and routing hardware. Cart repairs should include wheels, frame, brackets, fasteners, and mounted equipment. System-level planning reduces repeat teardown.
Shop the AirCoat System by Assembly
Use these verified internal links to reach the correct machine section and continue to diagram-matched replacement parts.
Titan AirCoat Air-Assisted Airless Spray System FAQs
Use these answers to choose the correct assembly page and plan a more accurate AirCoat repair.