
With the front cover off, the piston at the bottom of its stroke, pressure relieved and the cord unplugged, remove the suction set and foot valve housing. Unscrew the outlet valve retainer from the piston rod with a 5/16" hex wrench while the rod stays in the pump. Clean everything, reverse or replace a damaged seat, replace a worn ball, cage or crush washer, then refit the retainer with one drop of Loctite at 144 in./lbs.
The outlet valve rides on the piston rod, so a worn ball or a seat full of debris costs pressure on every stroke. Titan built the Impact fluid section so the outlet valve and its seat can be serviced without stripping the pump. The steps here follow the valve-service section of Titan's Impact 640 service manual, which the Impact 440 manual repeats with the same tools, torque and warnings.
When the Outlet Valve Is the Problem
Symptoms that point to the outlet valve
- The pump will not build or maintain pressure and the cheaper causes are cleared. Titan's chart names worn valve balls and worn valve seats among the internal causes.
- Uneven, surging pressure at the gun. Worn seats and balls can make a piston pump pulse, but rule out the hose, tip and pressure setting first.
- Solid yellow on the 440's pressure light with a new tip and the knob at maximum. The manual lists a stuck valve as one possible cause.
- Debris in the paint. Titan notes that valves often fail to seat simply because something is stuck in the seat, which a cleaning can fix.
Rule out the filter and tip first
Before you open the pump, work through what the chart lists ahead of the valves: a worn or oversized spray tip, the pressure knob, a clogged pump filter, gun filter or inlet screen (see replacing the pump manifold filter), an air leak where the siphon tube connects, and paint leaving the return hose in SPRAY. For surging, the chart also names the wrong type of airless hose and too much pressure. Our step-by-step check for an Impact that won't prime or build pressure walks through those in order.
Outlet Valve Parts and Tools
Ball, seat, retainer or the complete kit
Tools and supplies
- 5/16" hex wrench for the outlet valve retainer, and a means of tightening it to 144 in./lbs. (12 ft./lbs.).
- A wrench for the foot valve housing.
- Loctite for the retainer threads; the manual uses the drop supplied in the repacking kit.
- PTFE tape if you have a High Rider cart unit, whose siphon tube threads into the foot valve.
- Solvent and a metal waste container for priming afterwards, plus eye protection while you work.
Relieve Pressure and Isolate the Pump
The Impact 440 manual is clear that stopping the motor does not bleed the system; the gun and the PRIME/SPRAY valve do that. Follow its Pressure Relief Procedure: gun locked, switch and pressure knob to OFF, trigger lock released, the gun's metal body pressed to a metal pail and triggered until the hose is empty, gun locked again, valve turned down to PRIME. Only then pull the plug, so the motor cannot start while your hands are near the rod. Read our Impact series pressure relief basics if any of that is new to you.
Changing the Outlet Valve: Step by Step
Step 1: Relieve pressure and unplug
Remove the four front cover screws and the cover. Stop the sprayer when the piston is at its lowest position, then carry out the Pressure Relief Procedure and unplug the sprayer.
Step 2: Reach the outlet valve
Disconnect the return hose at the pump block, take the retaining clip out of the base of the foot valve housing and lift away the siphon assembly, then tilt the sprayer back. Pull the pusher stem clip, slide the pusher stem housing off and unscrew the foot valve housing from the pump block with a wrench.
Step 3: Remove the retainer, ball and seat
Loosen the outlet valve retainer with a 5/16" hex wrench and unscrew it from the piston rod, leaving the rod attached to the pump so it cannot spin. Take out the seat, ball, outlet cage and crush washer.
Step 4: Inspect the seating surfaces
Clear any debris and look closely at the outlet valve housing and seat. A damaged seat can be turned over or replaced. Clean and inspect the cage, crush washer and ball, and replace any that are worn or damaged.
Step 5: Install the new seat, ball and retainer
Reassemble in the reverse order of removal, with the cage and crush washer together. Put one drop of Loctite on the retainer threads before it goes into the rod, then torque it to 144 in./lbs. (12 ft./lbs.).
Step 6: Reassemble and prime
Screw the foot valve housing back into the pump block and refit the pusher stem housing and its clip. Reconnect the siphon assembly and return hose the way your frame needs (PTFE tape on a High Rider's siphon tube threads), fit the front cover, and prime the sprayer as the Operation section describes.
Check the Repair: Pressure Hold and Pattern
Does the pump hold pressure?
Prime and flush with the right solvent and no tip on the gun, then move the valve to SPRAY, lock the gun and turn the knob slowly clockwise. Check the foot valve housing and return hose joint you disturbed; if one weeps, run the pressure relief steps before you put a wrench on it. On the 440, solid green on the pressure indicator means 1901 to 3300 PSI. A light that falls back to blinking yellow at a high setting in SPRAY means a worn tip or a pump that still needs service.
Spray test
Fit the tip guard and tip, release the trigger lock and try a piece of cardboard. Tailing, or paint spitting out in gobs, means the pressure is too low; a pattern that is too light means it is too high. Settle on the lowest setting that atomizes fully, because the manual warns that extra pressure wears tips faster and adds overspray. If pressure still sags with a new tip, the packings may be next: see replacing the Impact 440 and 640 packings.
Ball and Seat Mistakes to Avoid
- Pulling the rod first. Unscrewing the retainer with the rod out of the pump lets the rod rotate. Keep it attached.
- Dropping the crush washer. Titan says the outlet cage must always be used with the crush washer.
- Skipping the Loctite or the torque. One drop on the threads and 144 in./lbs. (12 ft./lbs.) on the retainer.
- Putting a wrench on the piston. Titan warns this can damage the piston and cause leakage.
- Buying parts for a dirty valve. Debris stuck in a seat is a common reason a valve will not seat; clean first, then judge wear.
- Tightening a leaking joint under pressure. Relieve pressure before you touch any fitting.
Single Parts or the 805-845 Outlet Valve Kit?
Titan's procedure treats each piece on its own: reverse or replace the seat, and replace the ball, cage or crush washer only when worn or damaged. So if just the ball is pitted, the single 50164 outlet valve ball covers it, and a seat with one good face can simply be turned over. The cage and crush washer are the exception, since they must go in together; the manual gives them one number, the 704-642 assembly, which also comes in the repacking kit.
The 805-845 outlet valve kit appears on the Impact 440 fluid section page without a callout, and the manual does not print its contents. Open its product page or call us before you assume what is inside, especially if you need the retainer as well. If the pump is also due for packings, the repacking kit already carries the cage, crush washer and Loctite.
Order the Impact 440 Outlet Valve Parts
The single parts sit at callouts 11 to 15 on the Impact 440 fluid section diagram, and the Impact 640 fluid section page uses the same callouts and numbers. New to reading the 440 pages? Our Impact 440 parts diagram walkthrough explains callouts and replaced numbers. While the foot valve is off, the inlet valve guide covers the other half of the pump, and all repair guides lists the rest.
Outlet valve parts for the Impact 440:


 −8%
−8%
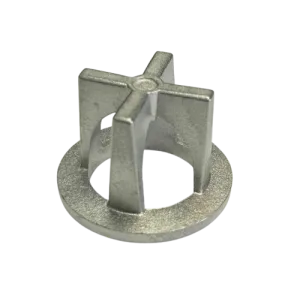


Outlet retainer, ball, seat, cage and crush washer at callouts 11-15.
The 805-845 outlet valve kit and 805-846 inlet valve kit.
Same outlet valve callouts for owners of the 640.
Not Sure Which Outlet Valve Part You Need?
Send us your Impact model and serial number and we will match the ball, seat, retainer or kit to your diagram before you order.
(713) 931-0006Order by Parts Diagram