
Push the pusher stem fully in first: that frees an inlet ball that is only stuck. If the Impact 440 still will not prime, relieve pressure, unplug and remove the front cover, suction set and pusher stem housing, then unscrew the foot valve housing with a wrench. Clean out debris, reverse or replace a damaged seat, refit the housing and siphon, and prime with solvent.
- Signs the Inlet Valve Is Sticking or Worn
- Inlet Valve Parts and Tools
- Pressure Relief and Power-Down Before Replacing the Impact 440 Inlet Valve
- Replacing the Inlet Valve: Step by Step
- Test the Impact 440 After Replacing the Inlet Valve
- Inlet Valve Mistakes That Bring Back the Problem
- Order the Impact 440 Inlet Valve Parts
The inlet valve, which Titan's manuals call the foot valve, is the first thing paint passes on its way from the siphon tube into the pump. When its ball sticks or its seat is fouled, the Impact 440 stops priming or loses pressure. The steps below come from the valve-service section of Titan's Impact 640 service manual, which the Impact 440 manual repeats with the same tools and warnings.
Signs the Inlet Valve Is Sticking or Worn
Symptoms that point to the inlet valve
- The sprayer runs but will not prime even with the valve in PRIME, the siphon tube submerged and the filters clean. Titan's chart lists a stuck inlet valve as a no-prime cause.
- It stopped priming after a change of fluid. The 440 manual warns that incompatible fluids and paint can stick the valves closed.
- Pressure will not build or hold once tip, filters and suction set are ruled out; worn valve seats and balls are on the list.
- Debris in the material. Titan notes that valves often fail to seat because something is caught in the foot valve seat.
Free a stuck valve before you replace it
The pusher stem exists for this. The Impact 440 setup steps have you press it fully in to make sure the inlet ball is free, and the 640 troubleshooting chart's answer to a stuck inlet valve is the same: insert the pusher stem. Try that before you buy anything. If paint has dried in the valve, the cure is to take it apart and clean it, and a cleaned valve with a sound seat may need no new parts. Flushing after every job, as the cleanup section asks, keeps this from happening.
Inlet Valve Parts and Tools
Inlet valve kit and single parts
Tools and supplies
- A wrench for the foot valve housing.
- PTFE tape: High Rider siphon tube threads get a fresh wrap, and Titan's fix for an air leak at the siphon connection is to tighten or re-tape it.
- Water (latex) or mineral spirits (oil-based) and a metal waste container for priming.
- Eye protection. The service manual's general tool list also includes needle nose pliers and screwdrivers.
Pressure Relief and Power-Down Before Replacing the Impact 440 Inlet Valve
Even a pump that will not prime can hold pressure in the hose, so treat it as live. Titan's Pressure Relief Procedure ends with the PRIME/SPRAY valve turned down to PRIME, and the operation section adds a sensible habit: keep the return hose in the waste container when you move the valve to PRIME, in case the sprayer is still pressurized. Before that, lock the gun, switch off, turn the knob to OFF, then release the trigger lock and trigger the grounded gun into a metal container to empty the hose. Unplug the cord last. Our pressure relief and injection safety basics for Impact sprayers go through it in more detail.
Replacing the Inlet Valve: Step by Step
Step 1: Relieve pressure and unplug
Unscrew the four front cover screws and set the cover aside. Bring the piston to the bottom of its stroke and stop the sprayer there, then run the Pressure Relief Procedure and pull the plug.
Step 2: Release the suction set
Screw the return hose out of the pump block. Pull the retaining clip from the base of the foot valve housing and free the siphon assembly (on a High Rider cart the siphon tube threads into the foot valve), then tilt the sprayer back for easy access to the fluid section.
Step 3: Remove the inlet valve and pusher
Take off the pusher stem clip and slide the pusher stem housing away from the foot valve housing. Then loosen the foot valve housing with a wrench and unscrew it from the pump block.
Step 4: Clean and check the seat
Clean every bit of debris out of the foot valve housing and examine the housing and seat. Reverse a damaged seat or replace it. The diagram shows the ball, cage, seat O-ring and seal in the same assembly, so look them over while it is apart.
Step 5: Fit the new inlet valve
Reverse the removal: thread the foot valve housing, rebuilt or new, back into the pump block and tighten it with the wrench. Slide the pusher stem housing back on and refit its clip.
Step 6: Reassemble, prime and test
High Rider: wrap the siphon tube threads with PTFE tape, screw the tube into the foot valve and clip the return hose to it. Skid or Low Rider: push the siphon elbow into the foot valve housing, push the retaining clip up into the groove inside the housing and screw the return hose into the pump block. Refit the front cover, then prime.
Test the Impact 440 After Replacing the Inlet Valve
Prime check
Put the siphon tube in solvent and the return hose in a metal waste container, set the knob to MIN, move the valve down to PRIME and switch on. The manual runs this flush for 15-30 seconds, with solvent coming out of the return hose into the container. If it does not, check that the valve really is in PRIME, that the siphon connection is tight and taped, and that the inlet screen and pump filter are clear. Our guide to priming an airless paint sprayer covers the routine.
Pressure and pattern check
Switch off, move the valve up to SPRAY, switch on and trigger the grounded gun, without tip or guard, into the waste container until clean solvent comes through. Lock the gun, raise the pressure slowly and look for drips at the foot valve housing and siphon joint; relieve pressure before tightening anything. With paint in, fit the guard and tip, test on cardboard and use the lowest setting that fully atomizes. On the 440, solid green on the indicator means 1901 to 3300 PSI.
Inlet Valve Mistakes That Bring Back the Problem
- Buying parts for a valve that was only stuck. Try the pusher stem, then clean, before replacing anything.
- Throwing out a reversible seat. Titan's procedure lets you turn a damaged seat over before you replace it.
- An untaped or loose siphon connection. An air leak there stops priming; tighten it or re-tape it with PTFE tape.
- Leaving the retaining clip out of its groove on Skid and Low Rider units. It is what holds the siphon assembly in the foot valve housing.
- Mixing incompatible fluids. Flush with the right solvent before changing materials, or the valves can stick closed again.
- Storing it dirty. The manual says to clean the sprayer, hose and gun after daily use, because built-up material affects performance.
Order the Impact 440 Inlet Valve Parts
The inlet parts are callouts 16 to 24 on the Impact 440 fluid section diagram, including the 805-351A inlet valve, the 762-137 foot valve seat and the 805-216A pusher assembly; the 805-846 inlet valve kit is listed there too. Titan's manual does not print the kit's contents, so compare it with the single parts on its product page. Siphon-side parts are on the Impact 440 suction set page. With the foot valve off, the outlet valve is within reach, and all repair guides lists other jobs.
Inlet valve parts for the Impact 440:
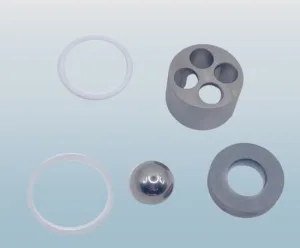


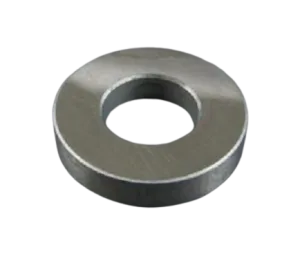


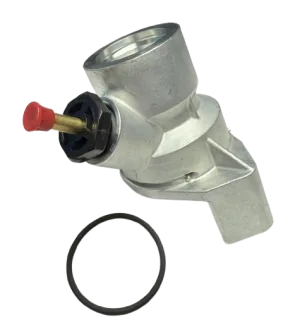
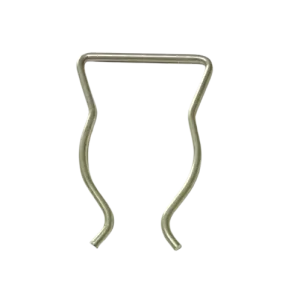
Inlet valve, ball, seat, cage, O-ring and pusher parts at callouts 16-24.
Suction set, return tube, inlet screen filter, O-rings and retaining clip.
Siphon tube, inlet screen and the complete fluid section options.
Need the Right Impact 440 Foot Valve Part?
Give us your Impact 440 serial number and we will confirm the inlet valve, seat or pusher number on the diagram before you order.
(713) 931-0006Order by Parts Diagram