





Titan Impact X 120 Main Assembly Parts
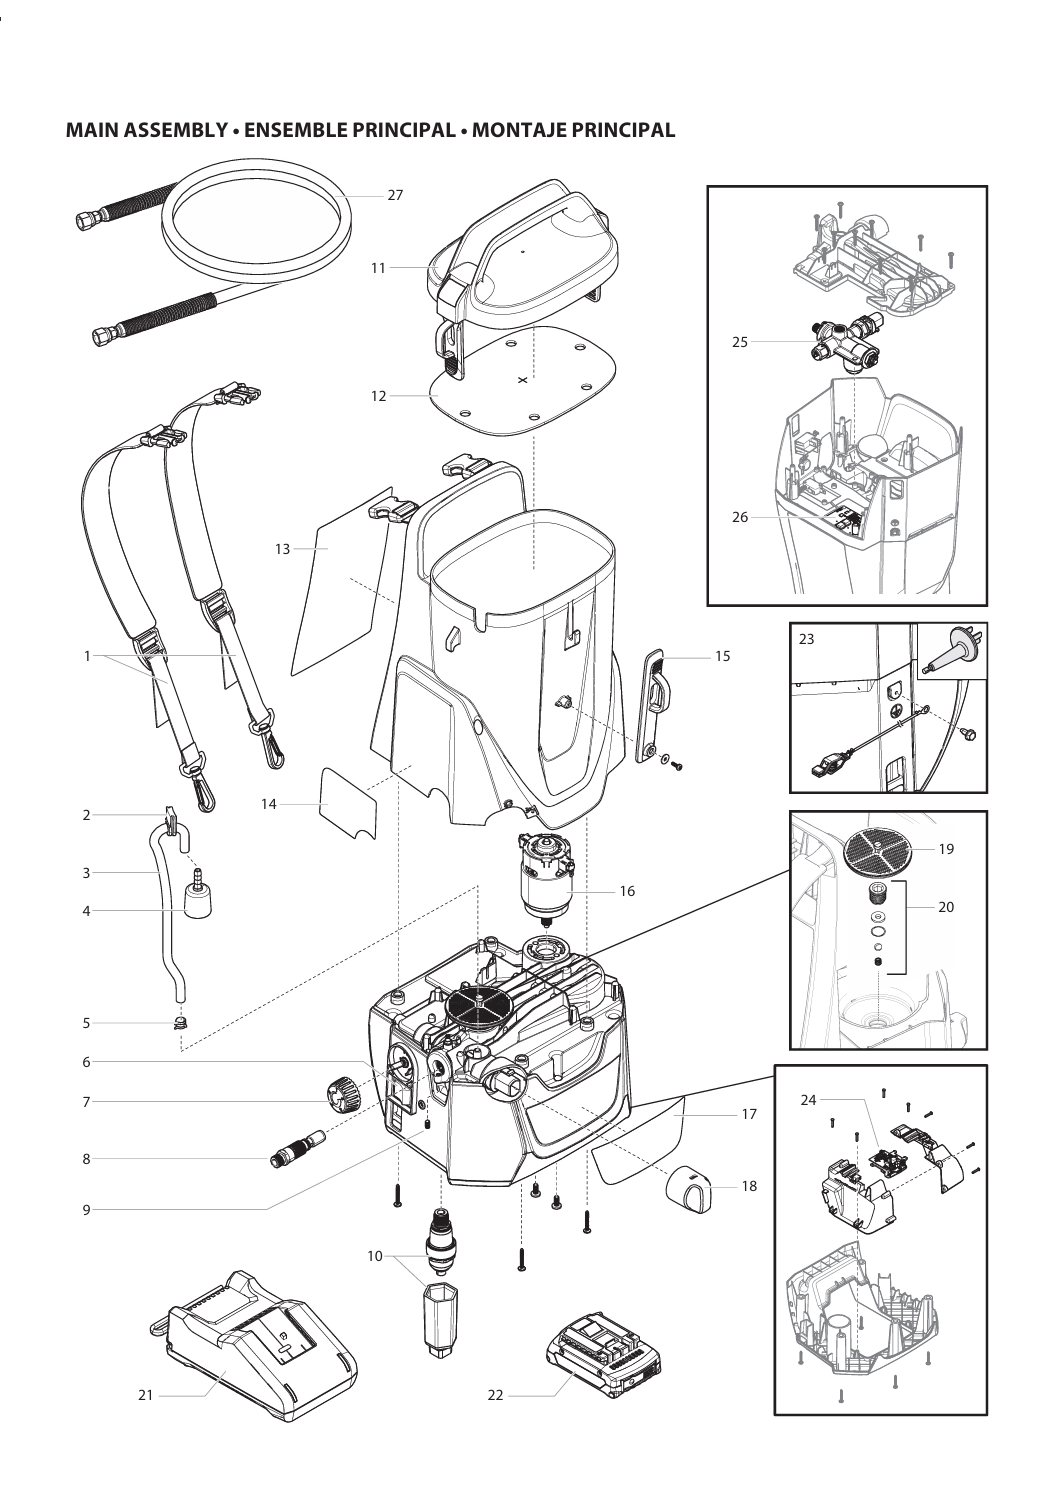
Shop genuine OEM Titan Impact X 120 Main Assembly Parts for components used throughout the sprayer's primary machine assembly. Use the applicable Titan Impact X 120 exploded Main Assembly diagram to identify the required component, match its numbered callout with the exact OEM part number, confirm the required quantity, and verify your specific sprayer configuration before ordering.
Find the Correct Impact X 120 Main Assembly Part
The Main Assembly parts section brings together components associated with the primary machine assembly of the Titan Impact X 120. Depending on the applicable parts breakdown, this section can include machine components, supports, brackets, mounting points, fasteners, hardware, and other items identified within the Main Assembly exploded view.
For accurate replacement-part selection, begin with the correct Impact X 120 parts diagram rather than relying on appearance alone. Locate the component on the Main Assembly illustration, record its numbered callout, and match that reference with the corresponding Titan OEM part number and quantity shown in the parts list.
What Is the Impact X 120 Main Assembly?
The Main Assembly is the central parts grouping used to identify components associated with the primary structure and machine-level arrangement of the Impact X 120. It provides an organized reference for locating components that do not belong specifically to another dedicated repair section.
Because multiple parts can have similar shapes, mounting patterns, or functions, the Main Assembly diagram is an important purchasing reference. Matching the diagram callout to the Titan OEM part number helps reduce ordering errors and separates Main Assembly components from parts belonging to the drive, fluid, filtration, cart, intake, or accessory systems.
Impact X 120 Main Assembly Areas to Inspect
Find Your Impact X 120 Main Assembly Parts Faster
Verify the complete Titan model designation and applicable configuration before using the parts breakdown.
Use the applicable Impact X 120 Main Assembly exploded view to locate the component that requires service or replacement.
Record the numbered reference associated with the exact component, bracket, support, fastener, or hardware item.
Match the diagram callout with the Titan OEM part number and verify the listed quantity before ordering.
Not Sure If the Part Belongs to the Impact X 120 Main Assembly?
Identify where the component is installed before ordering. Parts associated with pumping may belong to the Fluid Section, mechanical power-transfer components may belong to the Drive Assembly, and frame or mobility components may appear in a dedicated cart section. Use the Titan exploded diagrams to determine the correct parts group and then match the numbered callout with the OEM part number.
Impact X 120 Main Assembly Inspection Guide
| Condition | Inspect First | Also Check |
|---|---|---|
| Component appears loose or displaced | Mounting points and applicable hardware | Brackets, supports, adjoining components, and attachment surfaces |
| Bracket or support is damaged | Damaged component and mounting area | Related fasteners, adjoining supports, and nearby machine components |
| Fastener or hardware is missing | Main Assembly diagram and numbered callout | Associated mounting components and listed quantity |
| Machine component is visibly damaged | Affected component and attachment area | Surrounding components for secondary damage or misalignment |
| Part was removed during another repair | Original position and orientation | Related hardware, connections, and applicable service instructions |
| Correct replacement part is uncertain | Impact X 120 Main Assembly exploded diagram | Match diagram + callout + OEM part number + quantity |
Main Assembly Part or Another Impact X 120 System?
Start here for primary machine components, supports, brackets, mounting points, fasteners, and hardware identified on the Main Assembly diagram.
Use the applicable drive parts section when the component is associated with mechanical power transfer, drive housing, or related drive-system hardware.
Use the Fluid Section for components directly associated with pumping, valves, packings, seals, and the sprayer's material-handling pump assembly.
Use the appropriate dedicated section for frame and mobility components or external spray equipment such as hoses, guns, tips, guards, and related accessories.
Impact X 120 Main Assembly Service Guidance
Before removing components, note their position, orientation, mounting arrangement, and related hardware to support accurate reassembly.
When replacing a damaged component, inspect adjoining brackets, fasteners, supports, and mounting points for secondary wear or damage.
Use applicable Titan service information for shutdown, disassembly, installation, fastening, adjustment, and operational checks after repair.
Find the Correct Impact X 120 Parts Section
| Repair Area | Parts Section | Use This Section For |
|---|---|---|
| Primary machine structure | Main Assembly | Machine components, brackets, supports, mounting points, fasteners, and related hardware |
| Mechanical power transfer | Drive Assembly | Drive-system components, housing, supports, mounting hardware, and related mechanical parts |
| Material pumping | Fluid Section | Pump, valve, packing, sealing, piston-related, cylinder, and fluid-handling components |
| Material filtration | Filter System | Applicable filter, housing, sealing, fitting, and related fluid-path components |
| Material intake | Siphon / Intake Assembly | Intake tube, hose, strainer, fittings, connections, and related material-supply components |
| Frame and mobility | Cart Assembly | Frame, wheels, handles, supports, mounting points, and related cart hardware where applicable |
| External spray equipment | Accessories | Spray guns, hoses, tips, guards, extensions, fittings, and related spray accessories |
Impact X 120 Main Assembly Service Safety
Shut down the Impact X 120, disconnect electrical power, engage applicable gun safety features, and perform the complete pressure-relief procedure before inspecting, loosening, removing, or replacing machine components. Secure the sprayer appropriately during service and follow the applicable Titan operating and service instructions for disassembly, installation, fastening, adjustment, and testing.
Buying the Correct Impact X 120 Main Assembly Part
Before ordering, verify the complete Titan Impact X 120 model designation, applicable sprayer configuration, correct Main Assembly exploded diagram, numbered callout, exact Titan OEM part number, and required quantity. This is especially important for brackets, supports, mounting components, fasteners, and hardware that may look similar across different machines.
Avoid selecting parts by appearance, approximate dimensions, or another Impact model's parts list. Use the applicable Impact X 120 documentation as the primary reference and confirm the OEM number before completing your purchase.
Explore More Titan Impact X 120 Parts
Use the Impact X 120 Main Assembly page for primary machine components, or browse the broader Titan Impact parts catalog when your repair involves another system or you need additional genuine Titan OEM replacement parts.
Shop Titan Impact X 120 Main Assembly Parts
Use the applicable Impact X 120 Main Assembly exploded diagram to identify the component you need. Match the numbered callout with the exact Titan OEM part number, verify the required quantity, and confirm your sprayer configuration before ordering.
View Impact X 120 Main Assembly PartsTitan Impact X 120 Main Assembly Parts FAQ
What are Titan Impact X 120 Main Assembly parts?
Main Assembly parts are components identified within the primary machine assembly breakdown for the Impact X 120. Depending on the applicable diagram, this can include machine components, brackets, supports, mounting pieces, fasteners, hardware, and related items.
How do I identify the correct Impact X 120 Main Assembly part?
Confirm your Impact X 120 configuration, locate the component on the applicable Main Assembly exploded diagram, record its numbered callout, and match that reference with the exact Titan OEM part number and quantity.
How do I know if a component belongs to the Main Assembly?
Check the applicable Titan parts breakdown. Components shown on the Main Assembly exploded diagram belong to this section, while pumping, drive, filtration, intake, cart, or accessory components may be listed separately.
Can I order Impact X 120 hardware by appearance or size?
Ordering by appearance alone is not recommended. Similar-looking fasteners, spacers, retainers, brackets, and hardware can have different specifications or applications. Match the diagram callout with the listed Titan OEM part number.
Should related components be inspected during a Main Assembly repair?
Yes. When a component is loose, bent, damaged, or missing, inspect adjoining brackets, supports, mounting points, fasteners, and nearby components for secondary damage or wear.
Is the Impact X 120 Main Assembly the same as the Drive Assembly?
No. The Main Assembly is a separate parts grouping. Mechanical power-transfer components identified in a dedicated Drive Assembly or drive-system breakdown should be selected from that applicable section.
Can I use a part from another Titan Impact model on the Impact X 120?
Do not assume interchangeability between Titan Impact models. Confirm the exact OEM part number against the applicable Impact X 120 parts documentation before purchasing or installing a replacement.
Where can I find other Titan Impact X 120 replacement parts?
Use the appropriate Impact X 120 parts section for the system being serviced, or browse the Titan Impact Sprayer Parts category to locate additional genuine OEM replacement parts and related equipment.