Titan 0277974 Air Plug
Seal the Original Air Inlet During Bleeder Conversion
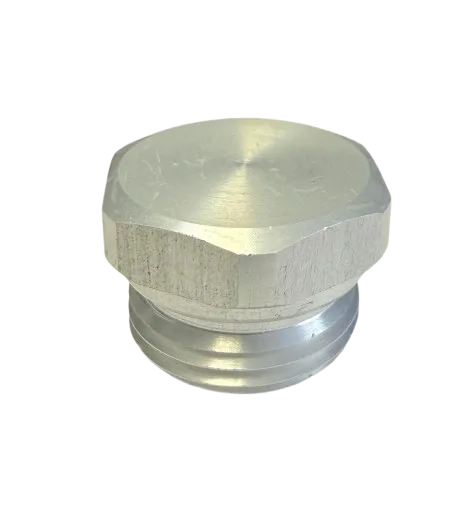
The Titan 0277974 is a threaded air plug used when converting compatible Maxum HVLP spray guns from non-bleeder to bleeder operation. It closes the original air inlet at the bottom of the handle after the hose fitting is relocated to the rear.
Product Overview
In the standard non-bleeder configuration, the turbine air hose connects to the fitting at the bottom of the spray-gun handle. During bleeder conversion, that fitting is removed and installed in the rear airflow-adjustment opening.
Once the fitting has been moved, the lower opening must be closed. This air plug threads into the original handle inlet, helping prevent air loss, contamination and incomplete airflow routing.
The plug does not generate or regulate airflow. Its purpose is to seal the unused threaded passage so air travels through the intended rear connection after conversion.
| Product type | Threaded HVLP spray-gun air plug |
|---|---|
| Function | Seals the unused lower air inlet |
| Compatible guns | Titan Maxum II and Maxum Elite HVLP spray guns |
| Part number | 0277974 |
| Installation location | Bottom of the spray-gun handle |
| Application | Non-bleeder to bleeder conversion |
Bleeder Conversion Function
A non-bleeder spray gun stops airflow when the trigger is released. In a bleeder configuration, air continues flowing whenever the turbine is running and the hose remains connected.
To create the bleeder setup, the rear airflow-adjustment control is removed. The lower air inlet fitting is then transferred to the rear opening, and the air plug closes the original handle connection.
This arrangement may support spraying certain higher-viscosity coatings and can improve hose positioning in confined work areas such as cabinet interiors.
Installation Guidance
- Turn off the turbine and disconnect the air hose.
- Remove the airflow-adjustment knob from the rear of the gun.
- Remove the air inlet fitting from the bottom of the handle.
- Install the fitting in the rear opening.
- Thread the air plug into the original lower inlet.
- Reconnect the hose and inspect the gun for air leakage.
Common Problems Addressed
- Air leaking from the unused lower handle opening.
- Reduced airflow after relocating the hose connection.
- Incomplete or unstable bleeder conversion.
- Dust entering an exposed air passage.
- Temporary plugs or improvised seals loosening during use.
The plug will not correct problems caused by a clogged air cap, damaged turbine hose, worn seals or inadequate turbine output. Inspect the complete system when poor atomization continues.
Maintenance and Inspection
Check the plug during routine gun cleaning. Confirm that it remains firmly seated and that no air escapes around the threaded connection.
Remove dust and dried coating carefully. Replace the plug if its threads become damaged, rounded or difficult to secure. When converting the gun back to non-bleeder operation, reinstall the original fitting and airflow-adjustment components.
FAQ Section
Review these common questions before installation.
What is this air plug used for?
Which spray guns use this plug?
Does the plug regulate airflow?
Does air flow continuously after conversion?
Can the gun be returned to non-bleeder operation?
Seal the Original Air Inlet During Bleeder Conversion
The Titan 0277974 is a threaded plug used in compatible Maxum HVLP spray guns. During conversion from non-bleeder to bleeder operation, it closes the original air inlet at the bottom of the handle after the hose connection is transferred to the rear of the gun.
Product Overview
This small threaded component performs a specific function within the airflow arrangement of a compatible Titan Maxum HVLP spray gun. In the standard non-bleeder configuration, the turbine air hose connects to an inlet fitting positioned at the bottom of the gun handle. Air travels through the gun only when the trigger and internal air valve permit it.
A bleeder conversion changes that arrangement. The original air inlet fitting is removed from the bottom of the handle and installed in the air-flow adjustment opening at the rear of the gun. Once the fitting has been relocated, the former handle inlet must be sealed. The air plug threads into that lower opening and closes it securely.
The component does not generate, regulate or filter airflow. Its purpose is to seal an unused threaded opening so the converted gun maintains the intended air path. Without the correct plug, air could escape through the open handle inlet rather than being directed through the converted gun arrangement.
| Product overview | Threaded plug for a compatible Titan HVLP spray gun air inlet |
|---|---|
| Primary function | Closes the original lower air inlet during bleeder conversion |
| Compatible gun family | Titan Maxum II and Maxum Elite HVLP spray guns |
| Part number | 0277974 |
| Installation position | Air inlet at the bottom of the spray-gun handle |
| Conversion type | Non-bleeder to bleeder configuration |
| System role | Prevents air leakage from the unused lower inlet |
Understanding Bleeder and Non-Bleeder Operation
In a non-bleeder HVLP gun configuration, airflow through the gun is controlled so that air delivery stops when the trigger is released. The air hose is normally connected at the bottom of the handle, and the rear air-flow adjustment control allows the operator to increase or decrease the amount of atomizing air.
In a bleeder configuration, air continues flowing whenever the turbine hose is attached and the turbine is operating. The air inlet fitting is moved to the rear of the gun, replacing the air-flow adjustment control. Because that control has been removed, airflow remains continuously available rather than shutting off completely when the trigger is released.
Bleeder operation can provide additional atomizing assistance for certain higher-viscosity coatings, including suitable enamels and latex materials. Relocating the hose connection to the rear can also make the gun easier to position in confined areas such as cabinet interiors.
How the Air Plug Is Used
Conversion requires more than simply adding the plug. The existing air-flow adjustment knob and lower air inlet fitting must be repositioned correctly so that the gun receives air through its rear connection.
- Turn off the turbine and disconnect the air hose from the spray gun.
- Remove the air-flow adjustment knob from the rear of the gun using the appropriate wrench.
- Remove the air inlet fitting from the bottom of the gun handle.
- Thread the removed inlet fitting into the rear opening previously occupied by the air-flow adjustment knob.
- Secure the fitting without damaging the gun body or threads.
- Thread the air plug into the original inlet opening at the bottom of the handle.
- Confirm that the plug is seated securely and that the lower opening is sealed.
- Attach the turbine hose to the relocated rear fitting and test the airflow arrangement safely.
Do not force the plug into a damaged or mismatched thread. Cross-threading can damage the gun body and prevent the opening from sealing correctly. Begin threading by hand and confirm smooth engagement before applying final tightening pressure.
Common Problems This Component Helps Prevent
An open or poorly sealed lower air inlet can interfere with the intended airflow path after conversion. Installing the correct plug helps prevent problems associated with leaving the former hose connection exposed.
- Air escaping from the unused opening at the bottom of the gun handle.
- Reduced airflow reaching the gun head after the hose fitting is relocated.
- Unstable atomization caused by an incomplete bleeder conversion.
- Dust or shop debris entering an exposed threaded air passage.
- Improvised sealing methods that may loosen during spraying.
- Difficulty restoring the gun to its documented bleeder configuration.
This plug will not correct unrelated problems such as a clogged air cap, damaged air hose, worn air-valve seals, incorrect projector set or inadequate turbine output. Diagnose the complete spray system before attributing poor performance to a single component.
Related Spray-Gun Components
The plug is serviced within a larger HVLP spray-gun assembly. During conversion or maintenance, inspect the surrounding air-delivery components for wear, contamination or damaged threads.
| Component | Relationship to the air plug |
|---|---|
| Air inlet fitting | Moves from the bottom of the handle to the rear opening during conversion. |
| Air-flow adjustment knob | Removed to create the rear location for the relocated inlet fitting. |
| Turbine air hose | Connects to the relocated rear fitting after bleeder conversion. |
| Air-valve seals | Support internal airflow control and should be inspected if leakage persists. |
| Gun body threads | Provide the sealing and mounting locations for the plug and air fitting. |
Inspection and Maintenance Guidance
Inspect the plug whenever the gun is cleaned or the airflow configuration is changed. Confirm that it remains firmly seated and that no visible air leakage is present around the threaded connection.
Remove dried coating and dust from the exterior without forcing contamination into the air passage. Do not use aggressive tools that can deform the plug or damage the gun-body threads. If the plug becomes rounded, cracked, cross-threaded or difficult to secure, replacement is preferable to continued use of a damaged component.
When converting the gun back to non-bleeder operation, remove the plug carefully, return the air inlet fitting to the lower handle position and reinstall the air-flow adjustment control at the rear. Store the plug in a labeled location so it remains available for future conversion.
| Inspection point | Recommended action |
|---|---|
| Thread condition | Check for cross-threading, flattening or contamination. |
| Plug seating | Confirm that the plug is secure without being overtightened. |
| Air leakage | Inspect the connection while the converted gun receives airflow. |
| Gun-body opening | Remove debris before installing the plug. |
| Storage | Keep the component labeled when the gun is returned to non-bleeder use. |
Commercial Benefits
A correctly completed bleeder conversion gives professional finishers another way to configure a compatible spray gun for specific coatings and working conditions. The plug supports that conversion without requiring improvised caps or permanent modification of the gun body.
- Supports the documented Maxum spray-gun conversion procedure.
- Closes the unused lower air inlet securely.
- Helps maintain the intended airflow route after hose relocation.
- Allows the conversion to remain reversible when components are retained.
- Reduces reliance on temporary or improvised sealing methods.
- Provides an exact replacement reference for repair and inventory planning.
Buying Checklist
FAQ Section
Review these common questions before ordering or installing the air plug.
What is the Titan 0277974 plug used for?
Where is the plug installed?
Which Titan spray guns use this component?
Does the plug regulate airflow?
Will air continue flowing after conversion?
Can the gun be returned to non-bleeder operation?
Should thread sealant be added?
No reviews yet. Be the first to review this product!